The power of parallax processing
Parallax processing is an exciting way to animate graphic layers on the web using arrow keys or mouse movement. In this article, learn how to create a parallax environment using jQuery and HTML5. Follow along with an example that shows how to create and animate a graphic using layers.
Introduction
With parallax processing on the HTML5 canvas you can display a three-dimensional (3D) scrolling effect in a two-dimensional (2D) drawing container. The basic idea is to make an animation appear 3D by using a layered effect in which the layers scroll at different speeds. For example, your layers can provide the illusion of distance by representing a foreground, middle ground, and background. This visual illusion should be similar to what you see when driving a car: Items closer to you move by quickly, and items in the distance appear to move much more slowly. There are several ways to achieve the 3D scrolling visual effect.
In this article, learn how to use the HTML5 canvas to create a 3D illusion in a 2D drawing container. You will create graphic layers and combine them to create the illusion of distance in a graphic. The article then shows how to use a combination of HTML5, jQuery, and JavaScript to create a parallax animation.
You can download the source code for the example in this article.
Graphic layers for parallax processing
The example in this article involves creating and animating a four-wheel drive vehicle in front of a mountain and sky. The first step is to create the graphics that will be used as the layers in the animation. With parallax processing, you have a layered effect, where the layers scroll at different speeds. The graphics you choose to use in your parallax environment are an important piece of the visual effect produced. They must be separated and saved in a certain way to give the illusion of depth and to be animated to scroll at different speeds.
When creating a set of graphics for a parallax visual, there are a few things to consider:
- How many layers of depth do you want to create? The example in this article uses three.
- All of your layers, aside from the background, need to be transparent. In the example, the sky will be a background .jpg file, and the mountains and four-wheel drive vehicle will be transparent .png files.
- Consider complementary and contrasting graphics to produce either an expected visual (things close by move faster) or something more avant-garde (graphics layers are more or less independent). In our example, the visual effect will be expected, not avant-garde.
- Your graphics should have seamless edges.
Background
Start by opening the image-editing software of your choice. Adobe® Photoshop® was used for the examples in this article.
The first graphic to create is the sky. The sky graphic does not need to be transparent because it will be used as the background layer in the scene. All other layers will appear in front of the sky graphic, and there will be nothing to see underneath it. The size of the sky graphic should be 800 pixels wide by 300 pixels tall, which will give you some room to animate the graphic within your final HTML5 canvas that will be 400 pixels wide. The sky illustration for the background in the example has been sized to 800×300 pixels and saved as sky.jpg, as shown in Figure 1.

Middle ground
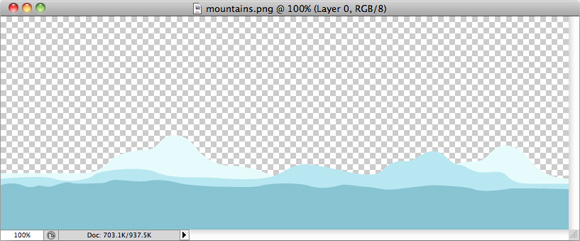
The next graphic you need to create, the middle ground layer, is a mountain illustration. The size of the mountains graphic also 800 pixels wide by 300 pixels tall. However, the mountains cover only the bottom of the graphic so the background above the mountains is transparent. To render the transparency over the sky background, save the mountain graphic as a transparent PNG file. You can’t use GIF because the anti-aliasing will create a jagged-edged effect rather than a smooth and seamless edge. Figure 2 shows the mountain graphic as it appears in Photoshop with transparency. You can see the empty pixels (as represented in Photoshop).
Foreground
The final graphic to create is the foreground. The example uses a four-wheel drive vehicle because it fits well with the animated scene in the example. This graphic is a bit different; it is not and does not need to be the same width as the background and middle ground graphics. To make it look somewhat realistic, you need to create a few different stages of the animated vehicle. Figure 3 shows three stages of the vehicle with the wheels and hubcaps slightly rotated in each instance.
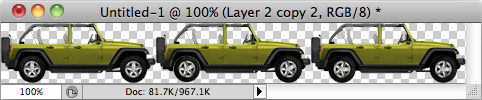
When used in the parallax animation, the vehicle graphic will be cropped to show only one vehicle instance at a time. As the animation proceeds, the instance changes by repositioning the graphic on the x plane within the cropped window that you create.
Now that the graphics are ready, the next step is to create the parallax processing effect.
Creating parallax processing functions
The languages used in this article to complete the parallax visual effect are HTML5 and jQuery (along with a little JavaScript). The HTML5 portion is simply within the HTML page, since it consists only of the HTML <canvas> element, as demonstrated in Listing 1.
<!doctype html>
<html lang="en">
<head>
    <meta charset="utf-8">
    <title>Parallax Processing</title>
</head>
<body>
<canvas id="parallax-canvas" width="400" height="300">
	Sorry, your browser does not support HTML5 Canvas.
</canvas>
<script type="text/javascript"
	src="https://ajax.googleapis.com/ajax/libs/jquery/1.7.2/jquery.min.js">
	</script>
<script type="text/javascript" src="assets/js/parallax-processing.js"></script>
</body>
</html>
Listing 1 includes a reference to the jQuery library on Google’s content delivery network (CDN). It also includes a reference to the parallax-processing.js file, which you use to write the custom jQuery for the parallax processing effect.
Within the parallax processing file, the first thing you must do is set all of the variable values that will be used throughout the script.
- Set the width and height of the parallax
<canvas>element that you added as HTML. Because these variables will be used throughout the script they are namedwandhto shorten the code used to access them. - Set the references to the graphic layers you created in the previous section. Create each graphic layer using the JavaScript
Imageobject.
Once created, the src property of the Image object will be set to a value that references the file path to the image on the web server.
With each image created, set a few positioning values for placement and animation purposes. The sky image has two associated variables:skydx, which defines the distance to move the sky image during each interval of the animation (discussed below), and skyx, which defines the xcoordinate from where to slice the sky image. The mountain graphic has two variables that have the same purpose; the only difference is they are specific to the mountain graphic: mountainsdx and mountainsx.
The vehicle graphic is a little different. It has four associated variables:
jeepxis the x coordinate. In this example, the x coordinate is set to 100, which positions it slightly off center in the canvas that is 400 pixels wide.jeepyis the y coordinate. The y coordinate is set to 210, which positions the vehicle toward the bottom of the canvas so it looks as if the it is sitting directly in front of the mountains.jeepsxsets the x coordinate of the graphic.jeepsXWidthis the x coordinate offset to accommodate the width of each vehicle instance.
var w = $("#parallax-canvas").width();
var h = $("#parallax-canvas").height();
var sky = new Image();
sky.src = "assets/img/sky.jpg";
var skydx = 2;  // Distance to move sky image
var skyx = 0;  // x coord to slice sky image
var mountains = new Image();
mountains.src ="assets/img/mountains.png";
var mountainsdx = 10; // Amount to move mountain image
var mountainsx = 0; // x coord to slice mountain image
var jeep = new Image();
jeep.src ="assets/img/jeep.png";
var jeepx = 100; // x coord of jeep image
var jeepy = 210; // y coord of jeep image
var jeepsx = 0; // x coord to slice jeep image
var jeepsxWidth = 155; // x coord offset for slice jeep width
var cntx =  $("#parallax-canvas")[0].getContext("2d");
setInterval(draw, 10, cntx);
The cntx variable is a reference to the <canvas> element’s getContext method. In HTML5, the <canvas> element is an object with many methods and properties of its own. The getContext method is one of the properties that needs to be accessed to draw a rectangle using JavaScript. This rectangle is what will be used as the drawing board for the “scene.” Finally, a setInterval call, set to be made every 10 milliseconds, calls a custom draw function and is passed the contx variable.
The setInterval, which is an important part of the parallax processing in the example, will be used to regularly update the position of the vehicle, mountain, and sky graphics. This is where the custom draw function comes in. The draw function accepts a _cntx argument that refers to the context object you referenced previously (see Listing 3). The first call is to a custom drawRectangle method that draws a rectangle on the canvas based on the width and height you previously specified.
function draw(_cntx) {
	drawRectangle(_cntx, 0, 0, w, h);
	_cntx.drawImage(sky, skyx, 0, 300, 300, 0, 0, w, 300);
	_cntx.drawImage(mountains, mountainsx, 0, 300, 300, 0, 0, w, 300);
	_cntx.drawImage(jeep, jeepsx, 0, jeepsxWidth, 60, jeepx, jeepy, 155, 60);
}
function drawRectangle(_cntx, x, y, w, h) {
	_cntx.beginPath();
	_cntx.rect(x,y,w,h);
	_cntx.closePath();
	_cntx.fill();
	_cntx.stroke();
}
Each image is then drawn using the Context object’s drawImage method. The drawImage method includes several parameters, as described in Table 1.
Table 1. Parameters, values, and descriptions of drawImage
| Parameter | Value | Description |
|---|---|---|
img |
image, video, or canvas |
Represents the image object that is used in the drawing. |
x |
x-coordinate |
Corresponds to the x coordinate, where the top-left position of the image is positioned. |
y |
y-coordinate |
Corresponds to the y coordinate, where the top-left position of the image is positioned. |
width |
width |
Pixel width of the image. |
height |
height |
Pixel height of the image. |
dx |
x-coordinate |
Corresponds to the x coordinate for the clipped part of the image. |
dy |
y-coordinate |
Corresponds to the y coordinate for the clipped part of the image. |
dwidth |
width |
The width of the clipped portion of the graphic. |
dheight |
height |
The height of the clipped portion of the graphic. |
When the images are initially drawn on the canvas using the custom draw function, the result looks like Figure 4. The sky is in the background, the mountains in the middle ground, and the four-wheel drive vehicle in the foreground.

Animation
The final step is to start animating the graphics to create the parallax visual effect. There are several ways to initiate the animation. For example, the movement can occur when you move the mouse to the left or right side of the graphic or when you press the arrow keys on the keyboard. Our example works based on the keyboard’s left and right arrows. To create those functions, the keydown event is applied to the window object using jQuery. The keydown event is applied to the window object to ensure that key presses are captured whenever a user is on the web page.
The keydown event receives an event object argument that is used to determine what key is pressed on the user’s keyboard by checking itskeyCode property. The left arrow is tied to keyCode 37, and the right arrow is tied to keyCode 39. When either is pressed, calculations are used to update the sky, mountain, and vehicle-related variables at the same time, based on the initial variables set for each new Image object, as shown in Listing 4. These calculations update the variables that will ultimately animate each graphic layer at different speeds.
$(window).keydown(function(evt) {
	switch (evt.keyCode) {
		case 37: // Left arrow
			if ((skyx + skydx) > skydx)
			  skyx -= skydx;
			else
			  skyx = w;
			if ((mountainsx + mountainsdx) > mountainsdx)
			  mountainsx -= mountainsdx;
			else
			  mountainsx = 398;
			if (jeepsx > 0)
				jeepsx -= jeepsxWidth;
			else
				jeepsx = (jeepsxWidth*2);
		break;
		case 39: // Right arrow
			if ((skyx + skydx) < (w - skydx))
			  skyx += skydx;
			else
			  skyx = 0;
			if ((mountainsx + mountainsdx) < (w - mountainsdx))
			  mountainsx += mountainsdx;
			else
			  mountainsx = 0;
			if (jeepsx < (jeepsxWidth*2))
			   jeepsx += jeepsxWidth;
			else
			   jeepsx = 0;
			break;
	}
});
The movement of the graphics actually occurs in the custom draw function, but the keydown event is where all of the variable values are updated, based on the user’s intention. The updated values, combined with the draw function, are what creates the true parallax effect that results in the illusion of depth and real-world movement. When complete, it’s important to wrap all of the script in a document ready event, which ensures that the document is ready and that all HTML elements are available for manipulation before attempting to manipulate them.
Wrapping it up
The options are unlimited when creating parallax animations—your creativity is ultimately the limit. For example, you could create a vertical animation, similar to the horizontal animation in the example, that works based on mouse movement, browser scrolling, or the keyboard. The Resources section includes other examples that use different techniques and widgets for easy parallax processing.


